3 Glute Bridge Variations That Will Lift Your Backside
Give your butt, hamstrings, and confidence a boost with these bodyweight exercises.

Don’t be fooled by the name. True, the glute bridge will put your butt muscles (a.k.a. glutes) through their paces. In fact, it’s one of the best glute exercises for older adults.
But this simple bodyweight move actually works your entire backside, including your hips, hamstrings, and lower back. The result: You’ll improve your balance and power, making it easier to bend, walk, and climb stairs.
Another reason to love the glute bridge: It helps reduce pain in your back, hips, and knees. Weak, unbalanced muscles put more stress on your joints. But strong, balanced muscles stabilize and support your joints for pain-free movement.
And if you sit most of the day, the glute bridge helps counteract the stiffness in your backside caused by being stuck in one position for long periods of time.
Ready to add the glute bridge to your workouts? We’ve rounded up three awesome variations. Whether you’re a total beginner or a frequent exerciser, you’re bound to find one that’s perfect for you.
How to Use These Exercises
Good form is key to targeting the right muscles and protecting your spine. Two form tips from physical therapists to keep in mind:
- If you can, flex your feet with your toes up. Drive through your heels and squeeze your glutes to lift your hips up.
- Brace your core and lift your hips high enough to engage your glutes—but not so high that your lower back arches.
Start with the first variation. If that feels good, try the next variation, and so on. Add any you like to your regular rotation.
As always, safety is key. The exercises here may be different or move advanced those you’ll experience in a SilverSneakers class. If you have a chronic condition, an injury, or balance issues, talk to your doctor about how you can exercise safely.
Can’t get down on the floor? Try one or more of these exercises to tone your legs and butt while standing.
Variation #1: Supported Glute Bridge
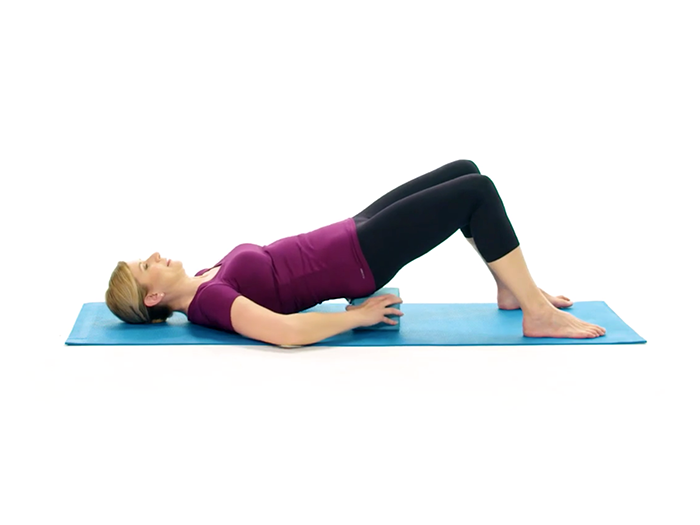
This variation helps your body get a feel for proper form and uses a yoga block to support your body. You can perform this move with or without shoes on, whichever is safest and most comfortable for you.
Hold the pose for 3 to 5 breaths
How to do it: Lie on your back with knees bent, feet flat on the floor about hip-width apart, and heels a few inches away from your buttocks. Brace your core to minimize the arch in your lower back.
Push through your heels and squeeze your glutes to lift your hips up. Place a yoga block under your hips, and press your arms into the floor for support. Breathe here for three to five breaths, or as long as you can with good form.
Variation #2: Glute Bridge
The basic glute bridge is a versatile exercise you can do almost anywhere. It’s great on its own or as a warmup to squats, lunges, and other lower-body exercises. If you can’t get down on the floor, you can even do it on a firm, supportive bed.
Do 8 to 10 reps
How to do it: Lie on your back with knees bent, feet flat on the floor about hip-width apart, and heels a few inches away from your buttocks. Press your arms into the floor for support, and brace your core to minimize the arch in your lower back.
Subscribe to our newsletter
It's quick and easy. You could be one of the 13 million people who are eligible.
Already a member? Click to discover our 15,000+ participating locations.
Follow Us
Push through your heels and squeeze your glutes to lift your hips up until your body forms a straight line from your knees to shoulders. As you get stronger, focus on getting your shins as close to vertical as you comfortably can at the top of the movement. Pause, then slowly lower your hips. That’s one rep. Do eight to 10 reps, or as many as you can with good form.
Variation #3: Feet-Elevated Glute Bridge
If your form is great and the basic glute bridge feels easy, try this variation for a challenge. You’ll elevate your feet, requiring more stability and a bigger range of motion.
Do 8 to 10 reps
How to do it: Lie on your back in front of a bench or other elevated surface. Place your feet on the edge of the bench about hip-width apart. Your buttocks should be on the floor, and your knees should be bent. Press your arms into the floor for support, and brace your core to minimize the arch in your lower back.
Push through your feet and squeeze your glutes to lift your hips up until your body forms a straight line from your knees to shoulders. Pause, then slowly lower your hips. That’s one rep. Do eight to 10 reps, or as many as you can with good form.
Check Your SilverSneakers Eligibility Instantly
SilverSneakers members can go to thousands of gyms and fitness locations across the nation, plus take exercise classes designed for seniors and led by supportive instructors. If you have a Medicare Plan, it may include SilverSneakers—at no additional cost. Check your eligibility instantly here.
Already a member? Get your SilverSneakers member ID and exclusive fitness content by logging in to or creating your online account here.


